Parched (2016) Watch Stream Full Movie
6 years ago
(or how to wing it with a camera you don’t know how to use)
If you’ve never shot film before, or if you’re working with a camera you don’t really know how to use, there are shortcuts to help you get to the gratification of shooting without so many calculations. Obviously, these are shortcuts and do not replace actual learning, but they can definitely helpful for trying out a film camera that you have never used before.
1. Shoot black and white: black and white film is way more forgiving, you have a full 5 stops of “error margin” that will still capture information. With color negative film you have 3, and with slide film you have 1 1/2 (this is in part why slide film is considered “professional” since it requires an exact exposure). If you don’t know what you’re doing or you don’t know your camera yet, you are much more likely to end up with printable images if you shoot black and white.
2. Shoot in broad daylight outside: maybe not high noon, but shoot during the day when there’s plenty of light. Low light situations are tricky, so avoid shadows and interiors at first or you’ll probably end up with a super underexposed roll, and that sucks. This is a major one for me when I test out vintage cameras, because you can also see if there are any leaks in the seals or foam and get a clear sense of the definition at a higher f-stop.
3. Use the Sunny 16 Rule: If you don’t know how to use your meter, or it doesn’t work, or you don’t have one, this trick is a life-saver.
“On a sunny day set aperture to f/16 and shutter speed to the [reciprocal of the] ISO film speed.”
Let me translate (dummy style just in case): f/16 is an aperture number on the lens, shutter speed is on top, and ISO is the number printed on the film. For example, Ilford Delta 400 has an ISO of 400. [I’ve posted articles explaining aperture and ISO for those who are interested]
An example of the Sunny 16 Rule would be: For film with an ISO of 100, aperture at 16 and shutter speed at 1/100 or 1/125 (depending on your camera)
ISO 400 would be f/16 at 1/500 (unless your camera miraculously has 1/400)
Here’s a handy daylight exposure guide guide from the inside of some Fuji Provia (ISO 100):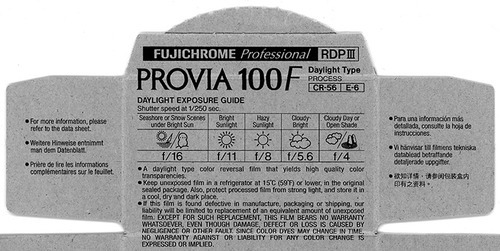
4. Bracket: This is a technique taught in ALL photography classes, and it’s actually pretty useful if you really want to be sure to get “the shot.” Basically, shoot one stop at the “correct” exposure, then shoot one stop up and one stop down. For example, if you were following the Sunny 16 Rule (and you really, really, really wanted to be sure to have a great photo) you could bracket like so:
ISO 400 - 1 shot @ f/16, 1/500; 1 shot @ f/22, 1/500, 1 shot @ f/11, 1/500
(you could also bracket by changing the shutter speed instead of the aperture)
5. Avoid Portraits (just at first): I know, I know this sounds horrible, but really if you’re learning how to use film (or a new camera) the biggest challenge is exposure. And portraits usually require perfect exposure and great lighting. If you’re not great with exposure and lighting, you may be disappointed with your first portraits.
0 Responses to How To Shoot Film For Dummies: 5 Steps
Post a Comment